Thinking of a way out to how your visitors upload file attachments to the WordPress forms?
It allows you the user to add any type of file like media to upload using the site form which in fact help streamline the process of gathering information from users.
By means of this article, you’ll come to know about creation of a File Upload form feature in your wordpress website.
How to use the File Upload Field feature in the WordPress website?
Nevertheless, the type of information your want using the form. You can upload file through different ways and in convenient way for the users. Thus, making forms fill out in easy manner prevents the form abandonment rate which helps in generating more revenue over the time.
Therefore, you may need the option of File Upload field in your WordPress forms to obtain all media files from the site visitors so they can submit the form successfully.
In most common ways a user might need an upload file function on your contact form. E.g.
- Job Applications requires an attachment for their resume files.
- Upload photos as images of the contestant for any giveaway.
- Client services forms are created to attach in a spreadsheet or a specific document.
- Customers support forms are usually contain the option for attaching files, documents using additional information.
Anyways, this is just the beginning WPForms Plugin can help you do even. The simple WordPress plugin help site visitors upload each file type depending on the usage type such as contact forms, including documents, images, video, audio etc.
Now the WordPress security is more advanced which means restricted File Upload’s are limited.
What is the ideal method to implement a File Upload form in wordpress?
Here are Step-by-Step guide to setup online File Upload form using WPForm
Step 1 – Use the File Upload form in WordPress
First & foremost you need to download and activate the WPForm plugin. Unlike other form plugin upload feature WPForm lets you add the file to upload on-site rather form pages.
In the subsequent stage access the plugin settings through visiting WordPress dashboard by clicking in WPForm >> Add New in left panel to create a new form and name.

You can add additional templates by scrolling down the screen and then type “File Upload Form” then click on the desired template.

Ensure you have activated the form template using the pack addon. WPForm activates the prebuilt upload form and uses a display with drag and drop builder.

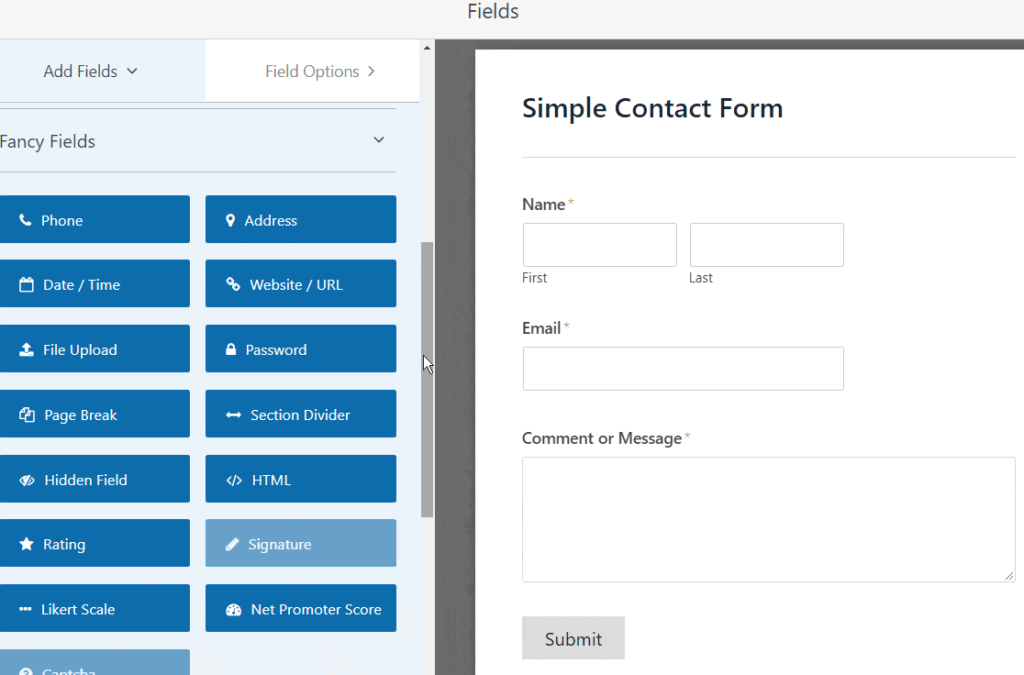
In the following screenshot, you can create additional fields and adds to your contact form through dragging them from the left-hand side to right-hand side.
With specific File Upload form template, you’ll come across different fields such as name, email, phone, File Upload as well as additional comments fields.
You can click on any form field of your choice. You can select the one interest you and then the drag and drop feature allows you to rearrange the contact form.
And then add the File Upload field by adding the WordPress form file.

Ensure you’ve clicked on the File Upload field to make necessary changes such as label, description, allowed file extensions, max file size, required, style etc.
Now, how do these File Uploads will be stored?
At present all files are safely stored using the WPForms folder within the upload directory of the site. Easily anyone can store files using the WordPress media library through selecting store field in the WordPress media library.
Now users can select their own “button” style File Upload file
You can select more compact File Upload field.

You can design your form and make it look good. We’ll cover that topic in some other post.
Step 2 – How to switch to old school File Upload field method
You can find the conventional way of changing the style of the File Upload field and use a classic style. Choose the style type from default modern style from the drop-down list.

Select the classic style of the form type and find. To prepare clutter free form field, you may need to enable conditional logic on the 1st classic File Upload field using the classic style.

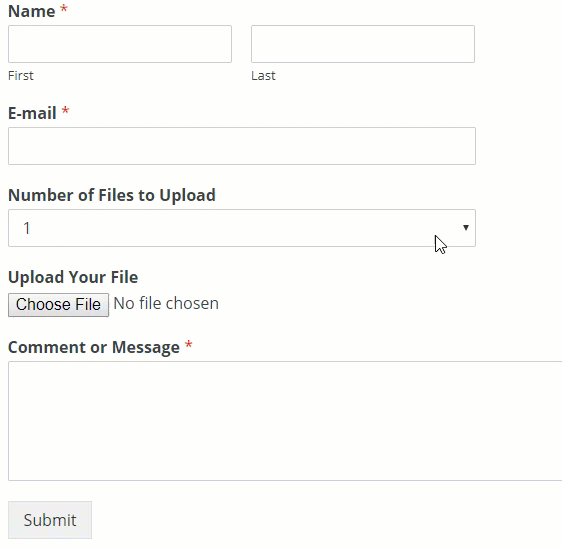
Classic File Upload field enable users to upload another single file. To add multiple File Upload using classic style uploader make sure you enable conditional logic and drag the dropdown field from left side of the panel to the form.

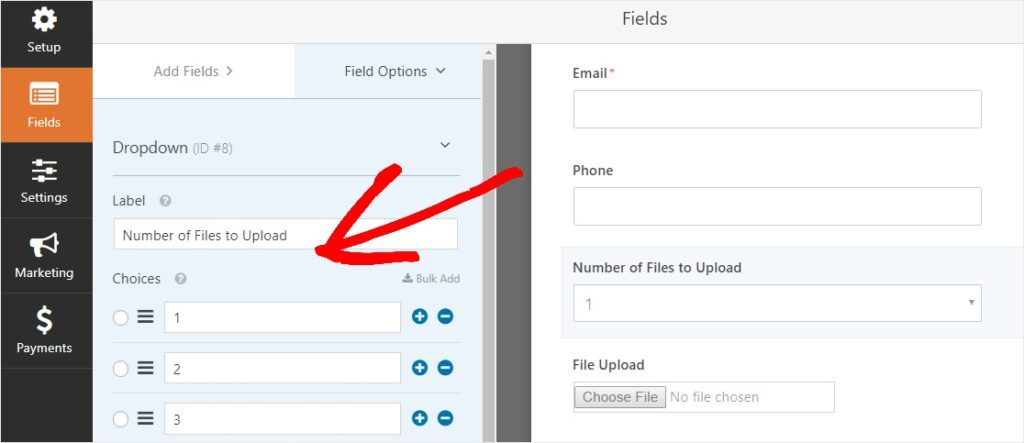
You can choose from the dropdown field from the left panel and edit dropdown field to increase in the number of files to upload and pick 1,2, and 3.

After then choose the File Upload field in the options and then you’ll see the expanded form in the left-hand side of the panel and select enable conditional logic.
Step 3 – Make sure to customize the File Upload form settings
You can start with the settings and then general.

Configure the following things appropriately such as Form name, form description, submit button text, span protection as well as GDPR enhancements and when you have finished up with the process then click on save.
Step 4 Configure the essentials in the form notifications.
Notifications are usually considered a good way to know when people submit the file through upload forms. Also, it is possible that notifications features can be turned off but it is unlikely if someone submits a form on your site.

Concerning the email messages, you receive when someone completes a form setting up the form notifications on WordPress require email addresses. Also, you get the option to insert smart tags you can use send a personalised notification to the users of your website once they have submitted the form successfully so that they get to know about it when you receive it.
Additionally, you will get a chance to brand your notification emails using a logo and image of your website. You can even edit the custom header image area which will be shown above with notifications like the WPForm logo below.

PS: Since the file, attachments can deviate the email delivery. WPForms plugin does not attach users’ files notifications but provided a File Upload through email as links.
Step 5 How to Configure the File Upload forms settings correctly?
You should have known that confirmations of mails are taken just immediately after the user have submitted the information to your form. Here you’ll find 3 different kinds of confirmation in WPForms such as message, display page, redirect.
You can configure each type of the File Upload form using simple form configuration and customizing the site visitors when they submit a form on your website.
To amend those setting choose the confirmation tab in the form edition available under setting option. In the next screen choose the confirmation type and the creation date. See the below screenshot for more information.

Step 6 – How To Implement File Upload Form On Website?
You must have created a form of the desired choice before you add up to your WordPress website.
Also, WPForms provides to add forms in multiple places on the website through pages, blog posts along with sidebar widgets.
To start with a new page or post in WordPress or an existing one. You can click inside the first block and add WPForms icon to add them inside the block.

Now you can insert the WPForm widget inside a block or you can choose from a dropdown and choose the desired type insert into the page. Choose the preferred upload form.
Step 7 – Check WPForm files
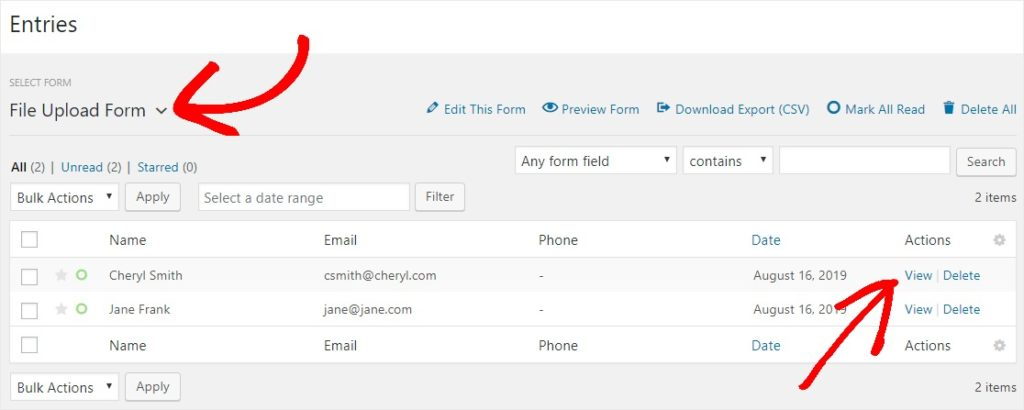
The WPForm plugin obtains all the submission entries which are uploaded via WPForms and then entries. Also, select the right type of form from the dropdown menu to evaluate the files entries.

Our Final Take on WordPress File Upload Forms
You should have now got the idea on how to create a File Upload form in WordPress.
If you allow the visitors of your website to upload files directly ensure you have read the post completely. If you have read the post. You can start using the File Upload forms function using the WPForms which is regarded as one of the best form builder plugins for WordPress today.
WPForm includes the amazing free feature – File Upload from the form which is backed with a straight 14-days of money back policy. There is no chance of not liking the plugin for any reason.
If you have liked the post, you can always subscribe to our newsletters. We will help you choose the best plugin, among others. The plugins recommended here are tried & tested by us and by no means we provide you with something that did not pass our tests.

